Stratum Zero NTP Server
9 minutes read •
Introduction
A looooong time ago I made an NTP stratum 0 NTP server out of a Raspberry Pi B and a suitable Adafruit GPS hat.
It doesn’t do any of these fancy new GNSS1, it just does GPS2.
But it does time and it maintains time sufficiently well, sufficiently accurately and sufficiently stable and consistently that it’s in the NTP.org pool.
But a few weeks ago, my Synology died (I’ll write about that soon), and rather than knee jerk replace the NAS, I decided to accelerate the plan to replace a couple of the older Raspberry Pi’s here which would buy me time to consider what to do with the Synology after I got a chance to look at it now Christmas and New Year are out of the way.
The oldest RPi is the one doing the original temperature monitoring but replacement of that is well under way, with a few articles talking about what I’m doing there.
The next oldest is the RPiB doing NTP and the next oldest is one of the general workhorses, a Raspberry Pi 4.
This article covers (what there is of) the build of a Raspberry Pi 5, and the config of NTP etc.
Hardware
Order
I ordered the following parts:
- Raspberry Pi 5 8GB
- Raspberry Pi 27W PSU
- Pimoroni NVMe Base Duo
- Raspberry Pi Active Cooler
- Waveshare LC29H(AA)
- WD-Black 2TB M.2 NVMe 2230
I conveniently already had a spare 256GB Sandisk microSDXC card which I installed the latest Raspbian on while I waited for my orders to arrive.
I doubt this unit is going to work particularly hard but for the tiny cost, why wouldn’t you have the cooler fan?
Lastly, the selection of NVMe…. the PCIe bus on the RPi5 does Gen2 speeds by default, and it wasn’t clear whether the Pimoroni board supported Gen3 speeds. So, the 2230 2TB NVMe, a Gen4 device, will never get pushed to its claimed 5,150MB/s, and so being a sensible price, reputable brand, and available, it fit the bill.
Every time a buy and build a little Raspberry Pi I consider other little NUC type boxes, but for “a little computer doing nothing particularly CPU taxing and being nice and frugal on the electricity” these things are hard to beat.
That whole list came to £335, plus ~£25-30 to cover the cost of the microSDXC I already had (although the Pi will boot from the NVMe perfectly happily).
Build
The NVMe slots are difficult to reach and doing the retaining screw up would be impossible post build, so I started there, installing the NVMe into the Base Duo, and installing the standoffs and the little rubber feet. If I want to add a further NVMe in future, I’ll need to undo the standoffs from underneath, but that’s fine.
Getting the PCIe cable installed is fiddly, shall we say. I found it easiest to install the RPi end first and then pop the other end into the Base Duo. If you have ways to hold the two boards still next to each other with the RPi inverted, whilst simultaneously inserting the cable, that might be easier.
I then carefully attached the active cooler and plugged in its cable. Be careful here; the plug only goes in one way round. No excessive force is required. No guarantees the cables are always the same colour, I guess, but on all of mine the yellow cable is outermost.
The Waveshare GNSS hat attaches to the GPIO pins. I ordered one of the extra tall GPIO headers as well as a 90° angled header so that I could see which worked best once I had the parts laid out on the desk in front of me.
As you can see in the pictures, I opted for the 90° header as it ensures the active cooler is completely clear, at the expense of making putting this in a case harder.
The Waveshare comes with a weatherproof antenna and the adaptor to connect to the board, so you’re all ready to go when it arrives.

Lastly, very carefully connect the GPS antenna to the Waveshare card:
…it just gently snaps together.
Make sure it’s located centrally and gently squeeze.
Troubleshooting / Status
There are four LEDs on the board, as follows, starting from the antenna end of the board:
- Red - Indicates power is on
- Green - Pulse Per Second (PPS)
- Green - Data Received (Rx) - data received by the board from the Pi
- Green - Data Transmit (Tx) - data transmitted by the board to the Pi
In normal operations, the red LED should be on, the PPS LED should flash once per second as soon as the board has a 3D position lock and the last LED will flash once per second to indicate the NMEA + PPS data being sent to the Pi.
If you’re watching the NMEA output from the Waveshare using cgps or gpsmon you’ll notice that each line of output starts with a five characters preceeded by a $.
The format for $XXYYY is as follows:
XX - tells you the GNSS constellation “talker identifier”
| XX | Constellation | Region |
|---|---|---|
| GA | Galileo | European |
| GB | BeiDou | Chinese |
| GL | GLONASS | Russia |
| GP | GPS | USA |
| GQ | QZSS | Japan |
| GI | NavIC | India |
| GN | Generic | All/Any |
YYY - tells you the sentence / protocol identier. There are many, but for example:
| YYY | Description |
|---|---|
| GGA | Global Positioning System Fix Data |
| GLL | Geographic position , longitude, latitude and time |
Software & Configuration
Raspbian installation is very straight forward; you download the Raspberry Pi Imager for your operating system, and pretty much follow the prompts, either picking the desktop version or the lite version (without all the desktop stuff). I’m not going down the rabbit hole of the detail of that, but shout if you think I should do an article on that…?
The packages we need here are the GPSD daemon, a time server daemon and optionally some troubleshooting tools.
But first, we need to make an alteration to the Raspberry Pi configuration.
The Waveshare spec sheet shows us that the PPS signal will be on GPIO PIN 18 and so we’ll add the following to /boot/firmware/config.txt:
dtoverlay=pps-gpio,gpiopin=18
We also need to ensure that:
- SPI is enabled
- Serial Port is enabled
- Serial Console is disabled
It’s a lot clearer in the GUI, but I use the minimal Raspbian because this isn’t going to be plugged into a screen.
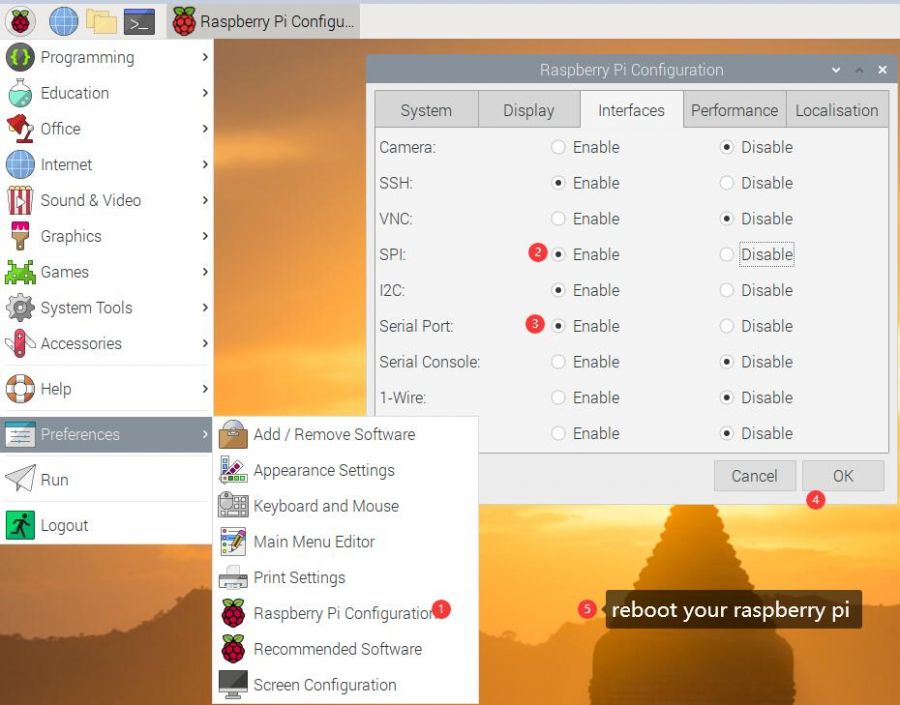
sudo raspi-config
- Go into the Interfaces menu
- Select Serial
- Select it and turn off
- Select “No” to serial console
- Select “Yes” to serial port
Now you can reboot your Pi and we can get to configuring the software.
Packages
First, we’ll install the packages we need:
gpsd chrony gpsd-tools pps-tools
Next we can get to configuration:
GPSD
My /etc/default/gpsd looks like this:
DEVICES="/dev/ttyAMA0 /dev/pps0"
GPSD_OPTIONS="-n"
USBAUTO="false"
…if you then restart gpsd with sudo systemctl restart gpsd then we can check it’s all working
gpsmon and/or cgps should stream NMEA output and show you the status of your GNSS. It may take a few minutes to get its first lock, so be patient.
Chrony
To get NTP onto the network, we need a time daemon. I prefer chrony but I’ve had success with ntpd in the past too if you prefer or are more familiar with that.
GPSD isn’t a source in Chrony terms. Chrony only expects to find peer, pool and server statements in the .sources files in /etc/chrony/sources.d.
GPSD is a refclock and so we’ll create /etc/chrony/conf.d/pps.conf with the following contents:
refclock PPS /dev/pps0 lock GPS+ refid GPPS trust prefer
refclock SHM 0 refid GPS precision 1e-1 delay 0.2
refclock SHM 1 refid GPS+ precision 1e-7
If we restart chrony we can then see some stats. I’ve snipped the other pool members from the followin output:
$ chronyc -n sources
MS Name/IP address         Stratum Poll Reach LastRx Last sample
===============================================================================
#* GPPS                          0   4   377    11   +566ns[ +695ns] +/-  227ns
#? GPS                           0   4   377    11   +102ms[ +102ms] +/-  200ms
#? GPS+                          0   4   377    11   +566ns[ +566ns] +/-  227ns
$ chronyc -n sourcestats
Name/IP Address            NP  NR  Span  Frequency  Freq Skew  Offset  Std Dev
==============================================================================
GPPS                        6   3    81     +0.002      0.045    +16ns   407ns
GPS                         6   3    80    -36.968    183.158    +99ms  1420us
GPS+                        6   3    81     +0.001      0.047    -43ns   426ns
I’m also going to add this to NTP Pool Project, so I need to permit the internet to come and get time from me, so I also added /etc/chrony/conf.d/acl.conf that looks like this:
# allow the internet
allow 0.0.0.0/0
allow ::/0
…obviously you should set that to whatever is appropriate for your use case.
If you want to add to the pool, go to the link above, create an account and off you go. The pool will monitor you and only let you in if you’re accurate and stable.
My server has been up for 24 days now. I added to my pre-existing pool account and it’s currently serving ~4,100 clients. Roughly 3,850 IPv4 and 250 IPv6.
Lastly…
Just make sure the daemons are set to start at system boot:
sudo systemctl enable gpsd chrony
Comments
You can comment on this blog post by publicly replying to this post using a Mastodon or other ActivityPub/Fediverse account. Known non-private replies are displayed below.